Cat Wheel Assembly Instructions
Need some help? Watch the Cat Wheel video below and follow the step-by-step assembly instructions! Everything you need is included in the package!
Scroll down and watch our assembly video.
Zoek je de montage-instructies in het Nederlands? Scroll naar onderaan deze pagina om ze te zien!
Assembly Instructions

Components:
(G/G1) Support panels
(F) Brake support panel
(E) Curved panels
(S1) Long screws
Step 1: Align the (G)-support panels with the pre-drilled holes in the (E)-curved panels and secure them with (S1)-long screws.
Step 2: Attach the (E)-curved panels to the other side of the (G/G1)-support panels. Please repeat the step three times.
*Each curved panel has slots for four (G) and two (G1)-support panels
Components:(I) Connector plates
(E) Curved panels
(S2) Short screws
Step 3: Once both sides are completed, use the (I)-connector plates, and further secure the (E)-curved panels tightly together with the (S2)-short screws.
Components:
(D) Rotational supports
(W1) Wheels
(S3) Short wheels screws
Step 4: Attach the wheels to the (D)-rotational supports. Please use (S3)-wheels screws for the installation, ensuring the wheels can spin freely.
Components:
(A) Base supports
(B) Base supports
(C) Rotational supports
(D) Rotational supports
(S1) Long screws
Step 5: Attach the panels to the inside of the (A)-base supports using (S1)-screws.
The installation order from left to right is (B)-base support, (D)-Rotational support (wheels), (C)-rotational support x2, (D)-rotational support (wheels), (B)-base support.
Components:
(W2) Wheels
(S4) Short screws
Step 6: Continue with the assembly of the four (W2)-wheels, using (S4)-screws.
Step 7: Lift the wheel and place it onto the base supports.
Step 8: Carefully align and press the velcro strips onto the wooden panels, placing the carpet mats along both edges where running surface will adhere.
Components:
(A) Base supports
(G) Support panel
(H) Brake panel
(J) Brake screw
Step 9: Locate the pre-drilled hole on one of the rear (A)-base supports. Use the (J)-brake screw to attach the (H)-brake panel.
Locate the running (G)-support panel and slide the brake block into the slit.
Your cat wheel is ready to be used!
Montagestappen
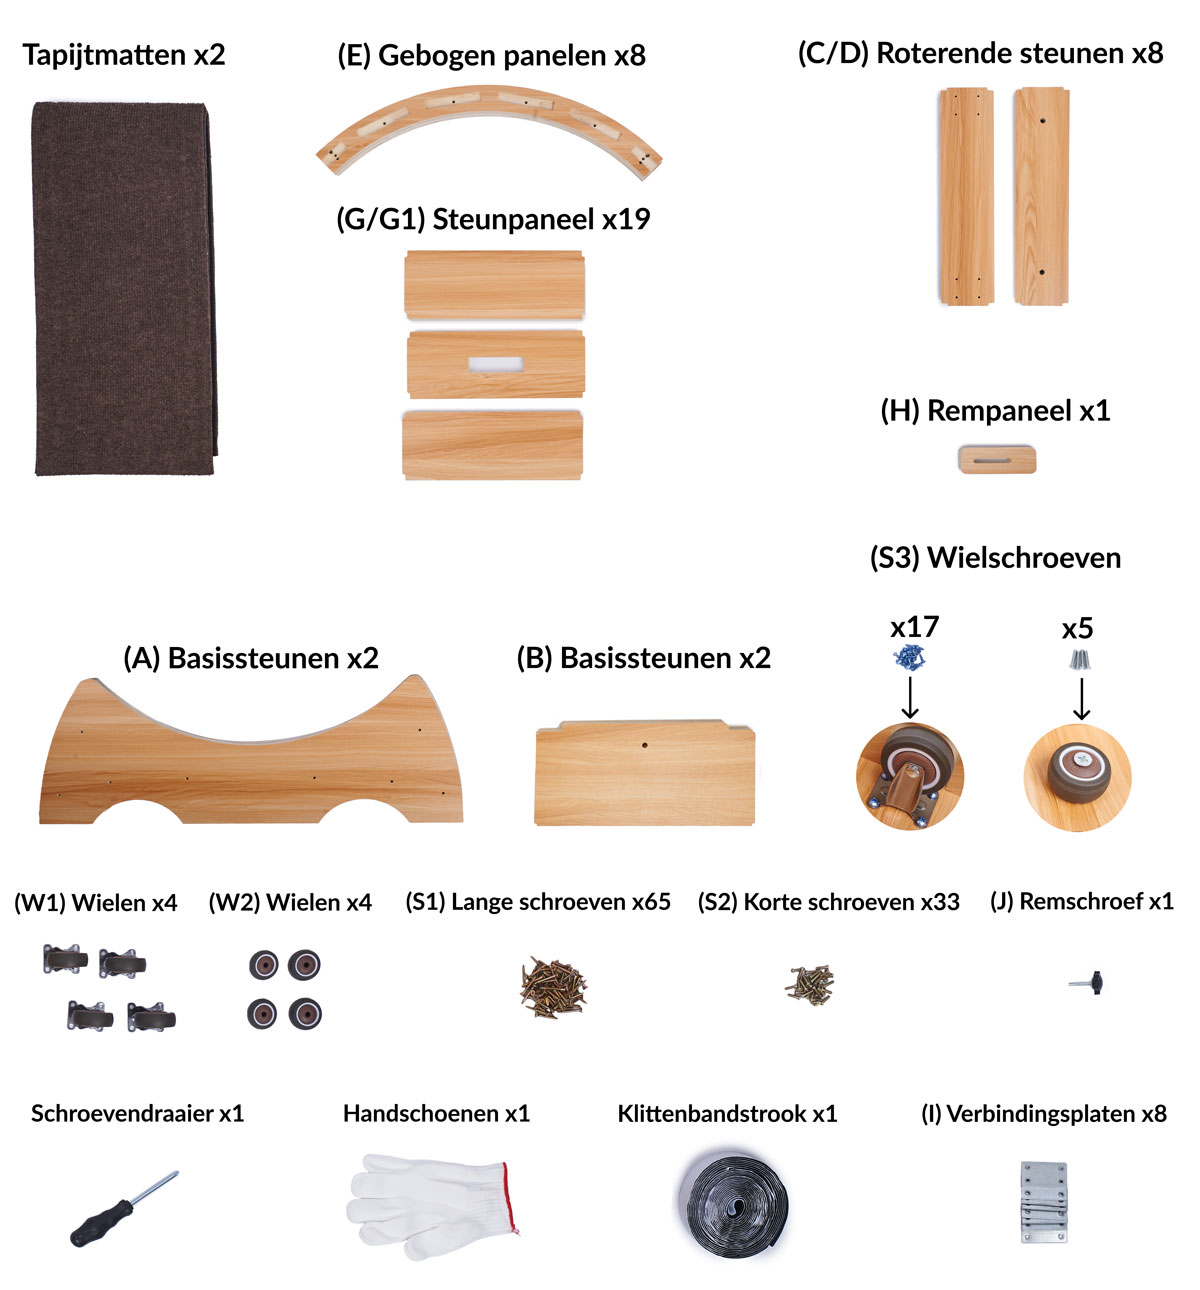
Inhoud:
(G/G1) Steunpaneel
(F) Steunpaneel
(E) Gebogen panelen
(S1) Lange schroeven
Stap 1: Zet de (G)-steunpanelen op één lijn met de voorgeboorde gaten in de (E)-gebogen panelen en bevestig ze met de (S1)-lange schroeven.
Stap 2: Bevestig de steunpanelen één voor één (met S1-lange schroeven). Bevestig vervolgens de (E)-gebogen panelen aan de andere kant van de (G/G1)-steunpanelen. Herhaal deze stap drie keer.
*Elk gebogen paneel heeft gleuven voor vier (G) en twee (G1)-steunpanelen
Inhoud:
(I) Verbindingsplaten
(E) Gebogen panelen
(S2) Korte schroeven
Stap 3: Om het frame van het wiel af te maken, bevestig de overige gebogen panelen aan de andere kant van de (G/G1)-steunpanelen.
*Let op dat één van de (F)-steunpanelen een gat in het midden heeft.
Zodra beide zijden voltooid zijn, gebruik je de (I)-verbindingsplaten en zet je de (E)-gebogen panelen stevig vast met de (S2)-korte schroeven.
*Zorg ervoor dat de (I)-verbindingsplaten met de verhoogde kant naar beneden wijzen.
Inhoud:
(D) Roterende steunen
(W1) Wielen
(S3) Korte wielschroeven
Stap 4: Bevestig de wielen aan de (D)-roterende steunen. Gebruik (S3)-wielschroeven voor de installatie, zorg ervoor dat de wielen vrij kunnen draaien.
Inhoud:
(A) Basissteunen
(B) Basissteunen
(C) Roterende steunen
(D) Roterende steunen
(S1) Lange schroeven
Stap 5: Bevestig de panelen aan de binnenkant van de (A)-basissteunen. De installatievolgorde van links naar rechts is (B)-basissteun, (D)-Roterende steun (wielen), (C)-Roterende steun x2, (D)-Roterende steun (wielen), (B)-basissteun.
Inhoud:
(W2) Wielen
(S4) Wielschroeven
Stap 6:Ga door met de vorige stap en bevestig de vier (W2)-wielen.
*Bevestig ze met S4-wielschroeven.
Stap 7: Til het gemonteerde wiel op en plaats het tussen de basissteunen.
Stap 8: Leg de klittenbandstroken zorgvuldig op op één lijn en druk ze op de houten panelen. Plaats de tapijtmatten op de klittenbandstroken. Dit wordt het loopgedeelte voor de kat.
Inhoud:
(A) Basissteunen
(G) Steunpaneel
(H) Rempaneel
(J) Remschroef
Stap 9: Zoek het voorgeboorde gat op één van de achterste (A)-basissteunen. Gebruik de (J)-remschroef om het (H)-rempaneel te bevestigen.
Zoek het loop-(G)-steunpaneel en schuif het remblok in de sleuf.